Moving Animation in a Video with CapCut Free Editor
For a long time, there was one feature in CapCut that I always avoided: keyframes.
Every time I saw that tiny diamond icon, I would pretend it didn’t exist.
I’d stick to the basic animations, drag a few presets, and move on with life.
Keyframes felt… scary.
Like one wrong click could mess up the entire edit.
But the funny thing is — in video editing, the tools we avoid the most are often the ones that unlock the biggest improvements.
And this week, I decided it was finally time to face that little diamond.
The Moment I Stopped Avoiding It
A few days ago, I sat down with CapCut after uploading several tutorials in a row.
I’ve been building momentum, publishing video after video, and I realized something powerful:
Teaching is helping me learn faster.
Every tutorial forces me to explore a feature more deeply.
So I opened a fresh project, clicked on that keyframe icon, and said to myself:
“Today we’re going to understand how this works.”
And surprisingly… it wasn’t confusing at all.
When Keyframes Finally “Clicked”
I started testing the basics:
- Add a keyframe here
- Move the object a little
- Add another keyframe
- Hit play
And right there — the object moved across the screen perfectly.
Smooth. Controlled. Professional.
It felt like discovering a new superpower inside CapCut.
For a moment I thought,
“Why didn’t I do this earlier?”
That simple animation made me smile, and instantly I knew:
If I can understand this now, I can make it easy for anyone.
So… I Made a Tutorial About It
This became my 8th CapCut tutorial, and honestly, one of my favorites.
📌 Moving Animation with CapCut Free Editor (Keyframe Tutorial)
🎬 Watch here: https://youtu.be/JeY9qdkCZd0
In the video, I walk step-by-step through:
- How to use keyframe
- How to animate objects smoothly
- Moving objects across the screen
- Why keyframes are essential for leveling up your editing
It’s beginner-friendly, but powerful enough for anyone serious about editing.
My CapCut Journey So Far
This tutorial marks the 8th video I’ve uploaded recently on this topic.
And honestly, I’m proud of it.
Not because of the numbers…
Not because of views…
But because I’m finally breaking the cycle of hesitation and inconsistency.
I’m learning.
Creating.
Uploading.
Improving.
And I’m actually enjoying the process — something I didn’t expect at the start after a long break from content creation.
If you’ve been watching these tutorials or even silently following along, thank you.
Your support means more than you know.
Need Help With YouTube or Video Editing?
If you’re working on your own YouTube channel or want to improve your video editing skills, I’m here to help.
You can reach me anytime at:
rafy@rafys.net
Whether you need guidance with:
- YouTube growth
- Content strategy
- Editing workflow
- Video polishing
I’d be happy to help you move forward.
Watch the Tutorial
You can watch and learn how to move objects smoothly with keyframes in a video with CapCut from this video: 👉 https://youtu.be/JeY9qdkCZd0
If you’ve ever avoided keyframes the way I used to — I hope this tutorial finally makes them feel clear and simple.
Why Keyframes Matter More Than You Think
Once I started using keyframes properly, I realized something important:
They’re not just a tool — they’re a gateway to creative freedom.
With presets, you’re limited to what the software decides.
With keyframes, you decide the movement:
- Speed
- Direction
- Smoothness
- Style
Suddenly, every piece of text, image, or shape became something I could bring to life.
Whether you’re editing for YouTube, TikTok, Reels, or client projects, understanding keyframes becomes a skill that instantly makes your videos look more professional — even if you’re using CapCut’s completely free editor.
And that’s exactly why I made this tutorial.
Not just to explain the feature… but to help you realize what’s possible once you get comfortable with it.
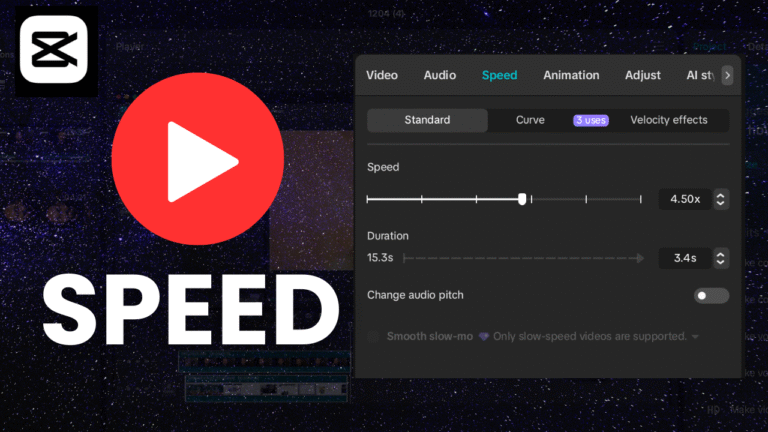
Tools & Features I Used in the Tutorial
If you’re following along with the video, here are some of the key tools you’ll see in action:
1. Keyframe Timeline Markers
Tiny diamonds that mark “movement points.”
2. Object Movement Controls
Dragging your object to the exact position for each keyframe.
3. Smooth vs. Linear Movement
Understanding how CapCut interprets transitions between points.
4. Multi-Direction Motion
Animating something up → down → left → right → diagonal.
I break each of these down step-by-step in the video so even beginners can follow easily.
What I Learned From Facing My Editing Fears
Avoiding keyframes taught me something personal:
Most of the time, the things we think are complicated…
… become simple the moment we actually try them.
It was never about the tool.
It was about the fear of getting it wrong.
But once I pushed past that hesitation, I realized learning is way more fun than avoiding.
Now — instead of skipping the keyframe icon — I click it happily.
Because I know I can control exactly what happens next.
Want to Learn More CapCut Tricks?
If you’re enjoying this CapCut learning journey, here are a few more tutorials you might love
- How to Zoom In or Zoom Out a Specific Part of a Video
- How to Blur Multiple Faces in CapCut
- Motion Tracking Tutorial
- Text Behind a Person Effect
- Record and Add Voiceover to a video
Bit by bit, these skills stack together — and before you know it, you’re editing like a pro.
Need a Freelance Video Editor?
If you ever need help with:
- Editing your videos
- Creating YouTube content
- Adding professional effects
- Fixing audio or visuals
- Polishing short-form content
There are talented freelance editors on Fiverr who can help you out.
You can hire one through my recommended freelance editor link 👉 https://rafys.net/fiverr
It’s a great option for creators who want to save time or improve quality fast.
Personal Help From Me
And if you want direct help with:
- YouTube channel growth
- Content direction
- Video editing advice
- Production workflow
You can always reach me personally:
I love helping creators move forward — especially those who feel stuck or overwhelmed.
Final Thoughts — And Your Next Step
Learning keyframes didn’t just teach me a video editing technique.
It reminded me that progress comes from showing up, even when something feels confusing.
If you’ve been avoiding certain tools in CapCut — this is your sign to try them.
Experiment. Play. Learn.
You might surprise yourself just like I did.
And if you want to start with something simple but powerful…
👉 Watch the Moving Animation tutorial here:
https://youtu.be/JeY9qdkCZd0
👉 And, don’t forget to follow full CapCut video editing course series: https://www.youtube.com/playlist?list=PLQOGKy2nPhxk8k3okWmnxofM0lZXACnqW
Thanks for reading — and thank you for being part of this journey.
More tutorials, more learning, and more growth coming soon